Gartner projects that 75 percent of enterprise apps will use no-code or low-code development by the end of 2026. Apple reviewed approximately 7.77 million app submissions in 2026, rejecting about 1.93 million — a rejection rate of nearly one in four that reflects the enormous volume of people now attempting to build and publish apps. The most common rejection reason is no longer technical quality but privacy compliance: missing privacy manifest files, incomplete data collection disclosures, and privacy violations are the single largest category of App Store rejections in 2026. The data paints a picture of an app development landscape that is more accessible than it has ever been — more people are building apps than ever before — and more professionally demanding than it has ever been, because the bar for what actually succeeds in the App Store and Google Play has continued to rise alongside the volume of submissions.
In 2026, building a mobile app genuinely does not require writing a single line of code — and for the majority of use cases that beginners and first-time builders have in mind, it never did. AI app builders, no-code platforms, and the vibe coding trend (describing what you want in plain English and letting AI generate the application) have made it possible to go from idea to working app in days rather than months, for costs ranging from zero to a few hundred dollars. Most business apps and internal tools can be built and running for $20 to $50 per month using an AI builder, covering the app itself, hosting, and a database — with a custom domain adding another $10 to $15 per year.
At the same time, the honest answer to “should I use no-code or learn to code?” depends critically on what you are building and what you intend to do with it. The apps that consistently succeed at scale — the ones that reach hundreds of thousands of users, generate significant revenue, and become defensible businesses — are typically built with custom code, not no-code tools, because the scalability limitations, vendor lock-in, and customisation constraints of no-code platforms become binding as the application grows. This guide covers the complete picture: every path from idea to published app, with honest costs, timelines, and when each approach is the right choice.
Step One: Validate the Idea Before Building Anything
The most common reason apps fail has nothing to do with code quality, design, or technical execution. It is that nobody needed them. Most people who want to build an app spend their time thinking about what they want to build rather than whether the people they are building it for will actually use it — and the consequences of getting this wrong are months of work and potentially significant financial investment with no return. The validation step that most beginners skip is the most important step in the entire process.
Validation before building does not require a working app. It requires finding the right answer to one question: would a specific, identifiable group of people use this app regularly and value it enough to either pay for it or to change their existing behaviour to include it? The methods for answering this question before building anything include direct interviews with 10 to 20 potential users whose characteristics match your target audience, a landing page describing the app concept with a waitlist sign-up to measure genuine interest, and an even simpler test: are people already trying to solve this problem in an inconvenient way — using spreadsheets, manual processes, or cobbling together multiple tools — that your app could replace? Evidence of existing workarounds is stronger validation than any verbal expression of interest, because workarounds reflect revealed behaviour rather than stated preference.
The specific problem your app solves should be definable in one sentence. If it takes three sentences to explain what problem the app addresses and for whom, the problem definition is not sharp enough to build around. A weak problem definition produces a weak app whose value proposition is too diffuse to communicate in the 10-second window an App Store listing provides to capture a potential user’s attention. Sharpening the problem definition before building — even if it means narrowing the scope significantly — almost always produces better outcomes than building to a broad vision and hoping the market validates it later.
Step Two: Define Your MVP Feature Set
Once the problem is validated and the target user is defined, the next step is determining what the minimum viable version of the app needs to do — not everything you eventually want it to do, but the smallest set of features that genuinely solves the core problem for your target user. Three to five features for version 1 is the right scope for most apps. If the feature list has ten items, it is too broad for an initial build and will take three times as long as it should and cost three times as much.
The MoSCoW framework — Must Have, Should Have, Could Have, Won’t Have — is the standard tool for MVP scoping. Must Have features are those without which the app cannot deliver its core value proposition at all: the functionality that is the reason the app exists. Should Have features are important but not critical for the first version. Could Have features are nice-to-have additions that can wait for subsequent versions based on user feedback. Won’t Have features are explicitly deferred — documented, not forgotten, but explicitly out of scope for the initial build.
Wireframing — creating simplified visual representations of each screen and the navigation between them — is the step that transforms a feature list into a buildable specification and that catches design problems before they become built-in constraints. Figma is the standard tool for wireframing in 2026, with a free tier sufficient for individual app projects. Creating a wireframe before touching any build tool — no-code or custom code — eliminates the most common cause of mid-build rework: discovering that the logical flow between screens does not work for the user tasks you had in mind. A wireframe that you can walk through step by step, simulating the user journey for your core use cases, is the clearest available signal that your design is coherent before you invest time building it.
Step Three: Choose Your Build Path
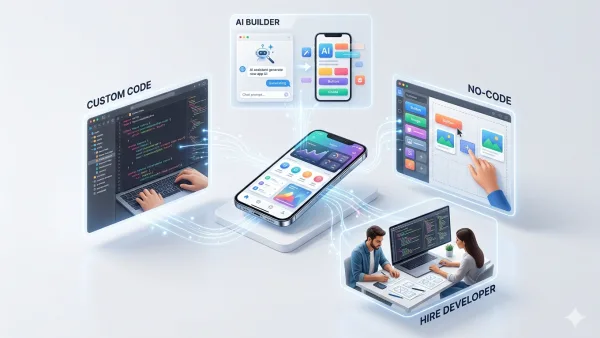
The build path decision is the most consequential technical choice in the app development process, and it is the one that most guides either oversimplify (everything is easy with no-code!) or overcomplicate (you must learn to code to build anything real). The honest answer is that each path has a specific appropriate use case, and matching the path to the use case produces dramatically better outcomes than selecting a path based on what sounds most appealing or most accessible.
Path 1: AI App Builders (Fastest, cheapest — best for MVPs and simple apps)
AI app builders — platforms like Lovable, Bolt.new, and NxCode — take a plain-English description of your app and generate a working application including frontend interface, backend logic, and database structure. The process is genuinely as simple as it sounds for straightforward apps: describe what you want, review the output, iterate through natural language conversation. A basic app with core functionality can be generated in hours. The cost is typically $20 to $50 per month on paid plans, with free tiers available for exploration. The limitations are real: AI builders handle standard patterns well but struggle with complex custom logic, and the generated code is often not production-quality for high-scale applications. Best for rapid prototyping, internal tools, MVPs where the goal is validating an idea before investing in custom development, and apps whose functionality fits common patterns the AI has been trained on.
Path 2: No-Code Platforms (More control, more learning curve — best for founders who want to own the build)
No-code platforms use drag-and-drop interfaces and visual logic builders to allow app construction without writing code. Bubble is the most powerful for complex web applications, offering visual programming tools capable of building genuinely sophisticated logic flows. Glide turns Google Sheets or Airtable data into mobile-accessible apps in minutes — ideal for internal tools that need to surface existing data. Adalo and Thunkable specialise in native mobile apps that can be submitted directly to the App Store and Google Play. The learning curve is steeper than AI builders but the control is greater: you can build custom layouts, complex conditional logic, and integrations with external services that AI-generated apps may not support cleanly. No-code tools range from free to around $50 per month for professional plans. The critical limitation: no-code platforms create vendor lock-in — if you outgrow the platform, rebuilding in custom code requires starting from scratch rather than migrating incrementally.
Path 3: Custom Code (Maximum control — best for serious apps intended to scale)
Building with custom code means either learning to code yourself (using Xcode for iOS with Swift, Android Studio for Android with Kotlin, or cross-platform frameworks like React Native or Flutter that produce native apps for both platforms from a single codebase) or hiring developers to build it for you. The development tools are free — Xcode and Android Studio cost nothing to download and use. The Apple Developer Program costs $99 per year; Google Play costs $25 as a one-time fee. Development time for building yourself ranges from six months to a year for a first non-trivial app, reflecting the time required to learn the programming language and framework alongside building the application. Hiring a freelance developer runs $5,000 to $25,000 depending on complexity and developer location; a full-service agency ranges from $50,000 to $150,000 and above. Custom code provides complete control, unlimited scalability, the ability to use any device capability (Bluetooth, NFC, camera APIs, HealthKit), and no vendor lock-in. It is the right choice for apps intended to reach significant scale, apps requiring capabilities that no-code platforms cannot support, and apps where the technical implementation is itself a competitive advantage.
Path 4: Hire Developers (Fastest to market with a complex app — highest cost)
Hiring developers — either freelancers through platforms like Upwork and Toptal, or a development agency — produces the fastest path from specification to working complex app for founders who are not learning to code themselves and whose app requires more than AI builders or no-code platforms can deliver. The cost range is wide and quality varies significantly; getting three or more quotes, reviewing previous work samples, checking references, and starting with a small paid test task before committing to the full project are the standard risk mitigation approaches. Establishing a clear, detailed specification before engaging any developer dramatically reduces scope creep and budget overrun — the two most common causes of app development projects failing commercially.
Step Four: Build, Test, and Iterate
Regardless of which build path you choose, the development process follows the same fundamental structure: build the core functionality, test it with real users as early as possible, and iterate based on what the testing reveals. The most expensive mistake in app development is building a complete version 1 in isolation before showing it to anyone — because the feedback from the first ten users consistently reveals issues that months of solo building could not anticipate, and addressing those issues is dramatically cheaper at the wireframe or early prototype stage than after a complete build.
For custom code development, TestFlight (iOS) and Google Play Console’s internal testing track (Android) provide pre-release testing platforms where you can distribute your app to a defined group of testers before public submission. TestFlight allows up to 10,000 external testers and is the standard mechanism for beta testing iOS apps. Using these platforms before submitting to the public stores serves two purposes: it surfaces bugs and UX issues in a controlled environment where feedback is solicited and actionable, and it produces the user behaviour data that demonstrates the app works before the launch that actually matters.
Apple’s 2026 submission data — 1.93 million rejections from 7.77 million submissions — highlights the importance of preparation before submission. The top rejection reasons are privacy manifest violations (missing PrivacyInfo.xcprivacy in bundled libraries), crashes on launch, and missing data collection disclosures. Reviewing Apple’s App Store Review Guidelines thoroughly before submitting, ensuring all third-party libraries have current privacy manifests, and testing on actual devices (not just simulators) for the crash categories that simulators do not reproduce are the preparation steps that prevent the most common rejections.
Step Five: App Store Optimisation and Launch
Getting your app live is not the same as getting it discovered. With over 1.8 million apps on the App Store and 3.5 million on Google Play, discoverability is the primary challenge for most new apps — not technical quality, not design, but whether potential users can find the app when searching for something it does. App Store Optimisation (ASO) is the discipline of making your app as discoverable as possible through the search and browsing mechanisms of the App Store and Google Play.
The elements of ASO that have the highest impact on discoverability are the app name and subtitle (which should include the primary keyword that potential users would search to find an app like yours), the keyword field (iOS) or long description (Android) which determines which searches the app appears in, and the app icon and screenshots which determine whether someone who finds the app in search actually clicks to learn more. The screenshots are particularly important: they are not documentation of your app’s features — they are marketing materials that must communicate the app’s core value in under 10 seconds of viewing. Caption text on screenshots, a clear before/after value proposition structure, and use of the first screenshot slot for the most compelling feature are the standard ASO best practices.
Ratings and reviews are the second most important factor after keyword optimisation, and they compound over time: apps with more positive reviews rank higher, which drives more downloads, which generates more reviews. Prompting for reviews at the right moment — immediately after a user completes a successful core action in the app, when they are most likely to feel positively about the experience — produces significantly higher review rates than prompting randomly or immediately after installation. The standard implementation uses Apple’s SKStoreReviewRequest API (iOS) or Google Play’s In-App Review API (Android) triggered at the optimal moment in the user journey.
Step Six: Monetisation Basics
The four primary monetisation models for mobile apps each have specific use cases, and choosing the wrong one for your app type is one of the most common commercial errors in app development. Subscriptions — monthly or annual recurring fees for continued access — are the most financially stable model for apps that provide ongoing value and are used regularly. They are the right model for productivity tools, health apps, professional utilities, and any app where continued engagement is expected. In-app purchases — one-time unlocks of specific features or content — are appropriate for apps where a core free experience can be meaningfully enhanced by paid additions. Paid downloads — users pay once to download — work for apps with clear, self-contained value that users need indefinitely once purchased (Things 3 and Procreate Pocket are the leading examples). Advertising — revenue from displaying ads — requires very high user volume to generate meaningful income and typically provides the worst user experience of any monetisation model; it is appropriate only for apps with massive scale and minimal premium feature options.
The freemium model — a free core experience with paid upgrades — is the most common structure in the App Store in 2026, combining elements of subscriptions and in-app purchases to balance acquisition (the free tier removes friction to download) and monetisation (the premium tier captures value from engaged users). The design of the freemium tier is critical: the free tier must be genuinely useful enough that users adopt the app and discover its value, but constrained enough that the paid tier is clearly worth the cost for regular users. Free tiers that are too limited drive immediate uninstalls; free tiers that are too complete remove the incentive to upgrade.
The 2026 Advantage: Building Faster Than Ever
The honest summary of app development in 2026 is that the technical barrier to building a working app has never been lower — and the bar for building an app that actually succeeds has never been higher. These two facts are not contradictory. They reflect a market in which more apps are being built and submitted than ever before (7.77 million Apple reviews annually), which means that the competitive standard for the apps that actually get found, downloaded, retained, and paid for has increased proportionally. The apps that succeed in 2026 are not necessarily the most technically sophisticated — they are the most clearly useful to a specific, identifiable audience, communicated most effectively in the App Store listing, and refined most quickly through real user feedback after launch.
The AI app builders and no-code platforms that make the first part — getting a working app built — so much faster than it was five years ago also lower the barrier for everyone else, which means the advantage from building fast has decreased even as the capability to build fast has increased. What has not decreased is the advantage from understanding your users better than your competitors do, from having a sharper problem definition, from iterating faster on real feedback, and from building the App Store presence that actually converts browsers to downloaders. Those advantages are as valuable in 2026 as they have ever been — and they require neither code nor no-code, just the disciplined attention to the human side of the product that has always been what actually determines whether an app earns a permanent place on someone’s phone.


0 Comments
No comments yet. Be the first to share your thoughts!